
add_filter('content_pagination',function($pages){
  $pages = array(implode("\n",$pages));
  return $pages;
});WordPressでパスワード保護記事を非表示
add_action('pre_get_posts',function($query){
  if(is_admin()){
 //管理画面は除外
    return;
  }
  if($query->get('post_status') == 'publish' || $query->is_archive()){
 // get_posts と query_posts両方対応
    $query->set('has_password', false);
  }
});UbuntuでのVPN(L2TP/IPsec)サーバの設定メモ
apt-get install strongswan xl2tpd
/etc/xl2tpd/xl2tpd.conf
[lns default]
ip range = 192.168.11.128-192.168.11.254
local ip = 192.168.11.99
pppoptfile=/etc/ppp/options.l2tpd
/etc/ppp/options.l2tpd
ms-dns  8.8.8.8
mtu 1358
mru 1358
refuse-pap
refuse-chap
refuse-mschap
require-mschap-v2
name xl2tpd
この2ファイルはpermission 644
cat /etc/ppp/chap-secrets
"user"  xl2tpd  "password"  *
cat /etc/ipsec.secrets
: PSK "secret"
/etc/ipsec.conf
config setup
virtual_private=%v4:10.0.0.0/8,%v4:192.168.0.0/16,%v4:172.16.0.0/12,%v4:25.0.0.0/8,%v4:100.64.0.0/10,%v6:fd00::/8,%v6:fe80::/10

conn L2TP-PSK-NAT
dpddelay=10
dpdtimeout=20
dpdaction=clear
rightsubnet=0.0.0.0/0
also=L2TP-PSK-noNAT

conn L2TP-PSK-noNAT
authby=secret
pfs=no
auto=add
keyingtries=3
rekey=no
ikelifetime=8h
keylife=1h
type=transport
left=%defaultroute
leftprotoport=17/1701
right=%any
rightprotoport=17/%any
ike=aes256-sha1-modp1024
echo "net.ipv4.ip_forward = 1" >> /etc/sysctl.conf
sysctl -p
ufwでport 1701 4500 500 許可
サーバ再起動
systemctl restart strongswan
systemctl restart xl2tpd
androidのyoutubeの削除(無効化しても復活するので)
SDK Platform ToolsをDLしてコマンドを実行
C:\platform-tools\adb shell pm uninstall -k --user 0 "com.google.android.youtube"
参考
https://sp7pc.com/google/android/34263
https://developer.android.com/studio/releases/platform-tools
WordPressでリスト画面のタイトルの修正
add_filter('get_the_archive_title', function($title){
  $tmp = explode(':',$title);
  if(count($tmp) < 2){
    return $title;
  }
  return sprintf('%s %s',$tmp[1],$tmp[0]);
});
Windows10からUbuntuのsshdのスタートアップ
ショートカットの作成
作業フォルダ
C:\Users\○○\AppData\Local\Microsoft\WindowsApps
リンク先
C:\Users\○○\AppData\Local\Microsoft\WindowsApps\ubuntu.exe -c "sudo service ssh restart"
UbuntuにLaravelのインストール
composerのインストール
curl -sS https://getcomposer.org/installer | php
sudo   mv composer.phar /usr/local/bin/composer
laravelのインストール
composer global require "laravel/installer=~1.1"
path通す
~/.composer/vendor/binではないので注意
export PATH="$PATH:~/.config/composer/vendor/bin"
プロジェクト作成
laravel new hoge
keyの生成
The only supported ciphers are AES-128-CBC and AES-256-CBC
php artisan key:generate
php artisan config:clear
nginx
server {
    listen       80;
    server_name  hogehoge.com;


    root   /var/www/hoge/public;
    index  index.php;

    location / {
        index  index.php index.html index.htm;
        try_files $uri $uri/ /index.php?$query_string;
    }
    location ~ \.php$ {
      fastcgi_pass   unix:/run/php/php7.2-fpm.sock;
      fastcgi_index  index.php;
      fastcgi_param  SCRIPT_FILENAME  $document_root$fastcgi_script_name;
      include        fastcgi_params;
    }
}
Ubuntu18.04にTensorFlowをインストールしたメモ
パッケージインストール
sudo apt update
sudo apt install python3-dev python3-pip virtualenv
venv作成
mkdir ~/python
virtualenv -p python3 ~/python
tensorflowのインストール
source ~/python/bin/activate
pip install tensorflow
日本語化
sudo apt install language-pack-ja
sudo update-locale LANG=ja_JP.UTF-8
実行
python test.py
WordPressでsitemap 自動生成
wp-config.phpがあるディレクトリにsitemap.phpを設置
サイトマップ
UbuntuにOpenVPNを構築しWindowsとAndroidから接続
Server
参考
Qiita
$  cat /etc/os-release
NAME="Ubuntu"
VERSION="18.04.1 LTS (Bionic Beaver)"
install
openvpn install
$ sudo apt install openvpn
easy-rsaのclone
$ git clone https://github.com/OpenVPN/easy-rsa.git
サーバー用秘密鍵の作成は上記参考
鍵の有効期限を伸ばしておく
./easy-rsa/easyrsa3/easyrsa
#set_var EASYRSA_CRL_DAYS           180
set_var EASYRSA_CRL_DAYS           3650
config
$ cat /etc/openvpn/server.conf
port   1194
proto  udp
dev    tun

ca          ca.crt
cert        server.crt
key         server.key
dh          dh.pem
crl-verify  crl.pem

ifconfig-pool-persist ipp.txt

server 10.8.0.0 255.255.255.0

push "redirect-gateway def1 bypass-dhcp"
push "route 10.8.0.0 255.255.255.0"
push "dhcp-option DNS 8.8.8.8"

client-to-client
keepalive 10 120
comp-lzo

user  nobody
group nogroup

persist-key
persist-tun

status      /var/log/openvpn-status.log
log         /var/log/openvpn.log
log-append  /var/log/openvpn.log

verb 3
$ sudo ufw status
Status: active

To                         Action      From
--                         ------      ----
1194/udp                   ALLOW       Anywhere
80/tcp                     ALLOW       Anywhere
443/tcp                    ALLOW       Anywhere
1194/udp (v6)              ALLOW       Anywhere (v6)
80/tcp (v6)                ALLOW       Anywhere (v6)
443/tcp (v6)               ALLOW       Anywhere (v6)
client
クライアント用秘密鍵の作成は上記参考
クライアントで必要なのは以下3ファイル
CA証明書 :ca.crt
pki証明書:[ユーザー名].crt
pki秘密鍵:[ユーザー名].key
Windows
クライアントソフト
vpnux
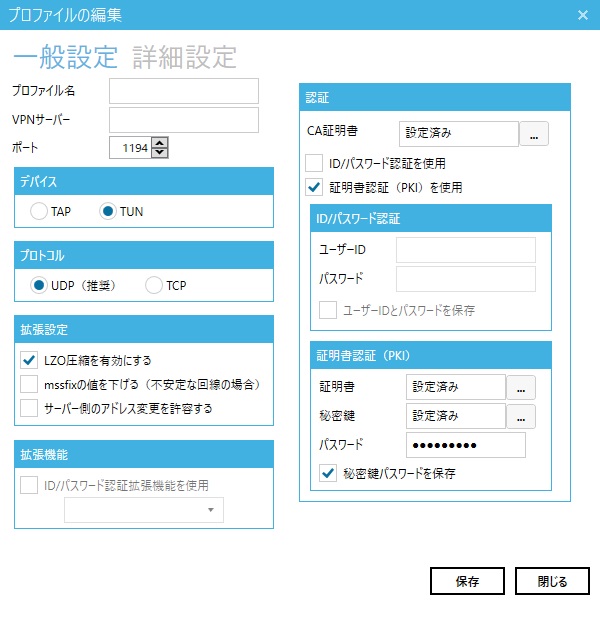
Android
qiita
クライアントソフト
OpenVPN for Android
注意点
- 基本設定:[種別]は[証明書]を選択してください。(初期状態は[Androidの証明書管理]となっています)
- IPとDNS:[設定情報を取得する]をON
- 認証/暗号化:[証明書のホスト名を確認する]をOFF